Disclaimer: Some links in this post may be affiliate links. Making a purchase after clicking one of these links may result in a commission for me. Also, as an Amazon Associate I earn from qualifying purchases.
Starting a new website can quite easily be done on a budget. In fact, the only real upfront costs that are absolutely required are for a domain name and hosting.
Buying a domain name and hosting for your site comes pretty early in the process, right after choosing a niche and coming up with a domain name. Once you’re through these initial steps, you’ll be ready to start building your site.
If you’re unfamiliar with domain names or hosting, you can basically look at it this way: if your site is named Jon’s Fishing Adventures, your domain name would likely be something like jonsfishingadventures.com, and the hosting would represent where your site’s posts, pages, images, etc. would be stored.
If you’re new to building websites, when you get to the step of buying a domain name and hosting, you can easily become overwhelmed. There are numerous options to choose from, and if you buy your domain and hosting from two different companies, it can get even more complicated.
I’ve been working in IT for over a decade, and I still don’t enjoy the process of setting up a new site. There’s just so many hoops you have to jump through before you can publish your first post.
That’s why I highly recommend going with Bluehost when first starting out. That’s what we’ve done with all of our sites so far, and it really has helped to streamline the process.
Not sure where to start?
Click below to learn our reliable, step-by-step process for building niche sites.

With Bluehost, you can purchase your domain and hosting in one step for next to nothing. On top of that, they have a simple WordPress integration that makes it really easy to create your site from within the Bluehost dashboard.
In this post, I’ll walk you through the basic steps for purchasing your domain name and web hosting from Bluehost. Once done, you can move on to more important things, like creating content for your site.
How to Sign Up for Bluehost (Step by Step)
To get started, if you haven’t already, head over to bluehost.com. Once there, you’ll be presented with a page that looks similar to this:

On this landing page, you’ll be presented with some basic information about Bluehost and a discount that will take place if you proceed. To move on, click the Get Started button.
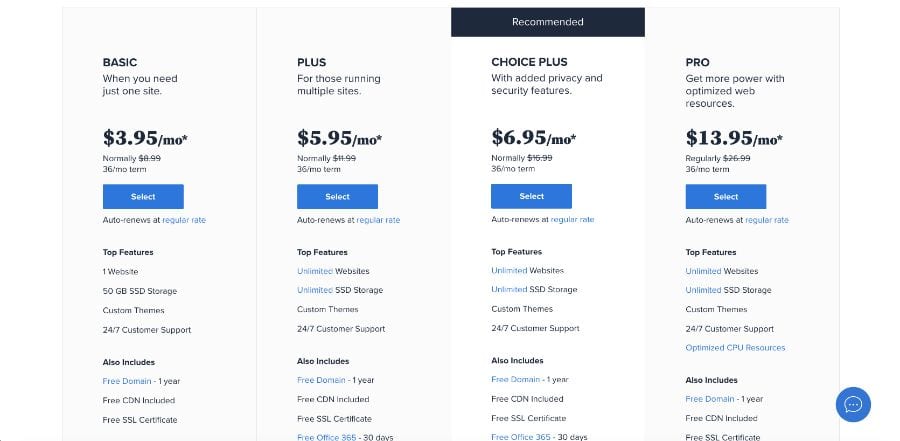
After clicking Get Started, you’ll see a few options to choose from. All of the options come with a free domain, so choose based on your hosting preferences.
I always go with the Basic option for 12 months. You can then add a couple of the security features from the Choice Plus plan in a later step, if desired.
Once you’ve selected your plan, it’s time to choose your domain. I’m going to make the assumption that you haven’t already purchased your domain elsewhere. If that’s accurate, enter your desired domain name in the Create a new domain section, then hit Next.
Ready to scale your content creation?
Click the image below to check out ContentPit, the ONLY writing service we trust on ALL of our niche sites:

If your domain name is already taken, change it up until you come up with something unique. If you need help coming up with a domain name, check out my article about picking a good domain name.

Once you’ve chosen a domain name that was available, you’ll be presented with a page to enter your account information. Simply fill out the required fields.

Next, you’ll see the payment information section. Enter your credit card details here, then click Submit.

On the next page, you’ll be presented with a summary of the plan that you chose. On this page, you can also select or deselect some of the extras. I highly recommend at least adding the Domain Privacy Protection option, as this will keep your personal information hidden, which would otherwise be public.
After submitting the information, your account will be created, and you should receive an email or two about signing up with Bluehost.

The next step will be to create a password so you can log into your Bluehost account. Enter your domain name in the Domain Name field, enter a desired password in the two password fields, then click the Create Account button at the bottom.

Next, you should see a confirmation that your account is ready to go. Click the go to login button to log into the Bluehost dashboard.
Are speed, security, and reliability important to you?
Click below to check out Rocket hosting, which we use to power all of our sites:


On the login page, enter your domain name, along with the password that you created above.

When you log into Bluehost for the first time, you’ll be presented with a few steps to set up your WordPress site. By filling in this information, Bluehost will be able to prepopulate many of the fields in WordPress, which will save you time down the road.

On the next page, check the boxes next to each option that aligns with your goals. This will help Bluehost pre-install a handful of plugins that might be useful for your site.
Personally, I skip this step and install my desired plugins manually, but if you’re new to building sites, it’s not a bad idea to let Bluehost handle it for you.

Next, you will be presented with a page to select a theme for your site. Take your time on this step and choose one that aligns with your vision of the site. Also, make sure it’s responsive (works across all device types).
As your site grows, you’ll likely want to move on to a paid theme. See my tools and resources page to see which theme I use.

Once you’ve finished going through the steps above. You’ll be taken to the main Bluehost dashboard. From here, you can click the View My Site button in the upper-right corner to view your site, or the WordPress button to be taken to the WordPress dashboard.
The WordPress dashboard is where you’ll want to go to further tweak your site, then start adding pages and posts.

When you log into your WordPress dashboard, you’ll see that you have a Bluehost button on the left-hand side that will take you to a page that can help to get you up and running quickly by adding posts, menus, etc.
If you’re new to building sites, this page can be pretty useful. Once you’ve spent some time in WordPress though, you’ll likely want to manage everything directly through the WordPress options on the left side.

That’s all there is to it. If you followed the steps above, you should have a site that’s up and running and ready for you to start adding content.
Final Thoughts
Starting a new site it hard enough. That’s why you want to do whatever you can to streamline the process and make it as easy as possible to get up and running.
While there are definitely faster web hosts that you can (and should) move to as you start gaining traction with your site, when first starting out, I recommend taking the easy road and going through Bluehost. Once you start generating significant traffic, move to something faster, like Rocket.net, which is what we use on all of our sites.
Because Bluehost offers both domain names and hosting in a single package and provides a seamless WordPress integration, it makes starting a new website much quicker and easier. Plus, the initial cost is dirt cheap.
If you’re ready to launch your site, click here to get started with Bluehost.

